By clicking “Accept All Cookies”, you agree to the storing of cookies on your device to enhance site navigation, analyze site usage, and assist in our marketing efforts. View our Privacy Policy for more information.
Cookies & Privacy
Installing a radon mitigation system is one of the most effective ways to reduce your family's long-term exposure to radon gas. When properly designed, installed, and maintained, a mitigation system can reduce indoor radon levels by 80-99%, often bringing even highly elevated homes well below the U.S. Environmental Protection Agency (EPA) recommended action level of 4.0 picocuries per liter (pCi/L).
The technology behind radon mitigation is actually quite simple. Most modern systems use a specially designed fan to create negative pressure beneath the home's foundation. Instead of allowing radon gas to enter through cracks and openings in the slab, the system captures the gas beneath the home and safely vents it above the roofline, where it quickly disperses into the outdoor air.
When installed correctly, these systems operate continuously with very little maintenance. Many homeowners hardly notice they are there beyond an occasional glance at the manometer or the faint sound of the fan operating.
Unfortunately, the effectiveness of a radon mitigation system depends almost entirely on how well it was designed and installed.
At first glance, most radon mitigation systems look very similar. They typically consist of polyvinyl chloride (PVC) piping, a radon-rated fan, a manometer, and a discharge point above the roof. Because of this, many homeowners assume that if the system looks professional, it must be working properly.
That assumption is not always correct.
Every home is different. Foundation design, soil conditions, drain tile systems, crawl spaces, sump pits, slab construction, and even the home's heating and cooling system all influence how radon moves beneath the building. A mitigation system must be designed around those conditions.
Choosing the wrong suction location, installing an improperly sized fan, routing the piping incorrectly, or placing the fan in an unsafe location can significantly reduce the effectiveness of the system. In some cases, these mistakes can even create new pathways for radon to enter the home.
The equipment itself is rarely the problem. Most failures occur because the system was not designed or installed according to nationally recognized standards.
One of the biggest challenges for homeowners is that radon mitigation is not regulated the same way everywhere.
Some states require contractors to be licensed and certified before they can install mitigation systems. Other states have few or no licensing requirements. In those areas, virtually anyone can advertise radon mitigation services regardless of their training or experience.
Even experienced contractors who specialize in plumbing, HVAC, or general construction may not fully understand the principles of sub-slab depressurization or the standards established by the American National Standards Institute (ANSI) and the American Association of Radon Scientists and Technologists (AARST).
That is why we recommend hiring a National Radon Proficiency Program (NRPP)-certified Radon Mitigation Specialist whenever possible. Certification demonstrates that the contractor has completed specialized training, follows nationally recognized installation standards, and participates in continuing education to stay current with industry best practices.
Unlike many household systems, a radon mitigation system usually does not provide obvious warning signs when something goes wrong.
The fan may still be running. The piping may still look professionally installed. The system may appear exactly as it did the day it was installed.
Yet the system could still be pulling air from the wrong location, leaking radon back into the home, or failing to create enough suction beneath the foundation to reduce radon levels.
This is one of the reasons radon is often referred to as an invisible hazard. You cannot see it, smell it, or taste it, and you usually cannot tell whether your mitigation system is working simply by looking at it.
The only way to know with confidence is to test.
Installing a mitigation system is not the final step. It is the beginning of confirming that the solution actually worked.
Once the system has been operating continuously for at least 24 hours, the home should be tested again to verify that radon levels have been reduced. Whenever possible, this testing should be performed by an independent NRPP-certified radon measurement professional rather than the contractor who installed the system.
Independent testing provides an unbiased confirmation that the system is performing as intended.
Testing should not stop after the initial installation. Homes should be retested every two years, even if the system appears to be operating normally. Additional testing is also recommended after major renovations, foundation work, HVAC replacements, or other changes that may affect how air moves through the home.
Routine testing is the only reliable way to confirm that your mitigation system continues to provide the level of protection it was designed to deliver.
Although some problems require professional testing to identify, homeowners should periodically inspect their mitigation system for obvious warning signs.
These include:
If you notice any of these conditions, the system should be inspected by an NRPP-certified mitigation professional as soon as possible.
The following photographs are all examples of actual mitigation systems we have encountered during home inspections. None of these images come from textbooks or staged demonstrations. Every installation shown below was found in an occupied home.
Some of these systems simply fail to reduce radon effectively. Others violate nationally recognized installation standards and may actually increase the risk of radon entering the home. Several appear perfectly normal until you take a closer look.
That is perhaps the most important lesson of all. A radon mitigation system should never be judged by appearance alone. Proper design, professional installation, and independent follow-up testing all work together to ensure that the system is protecting your home the way it was intended to.
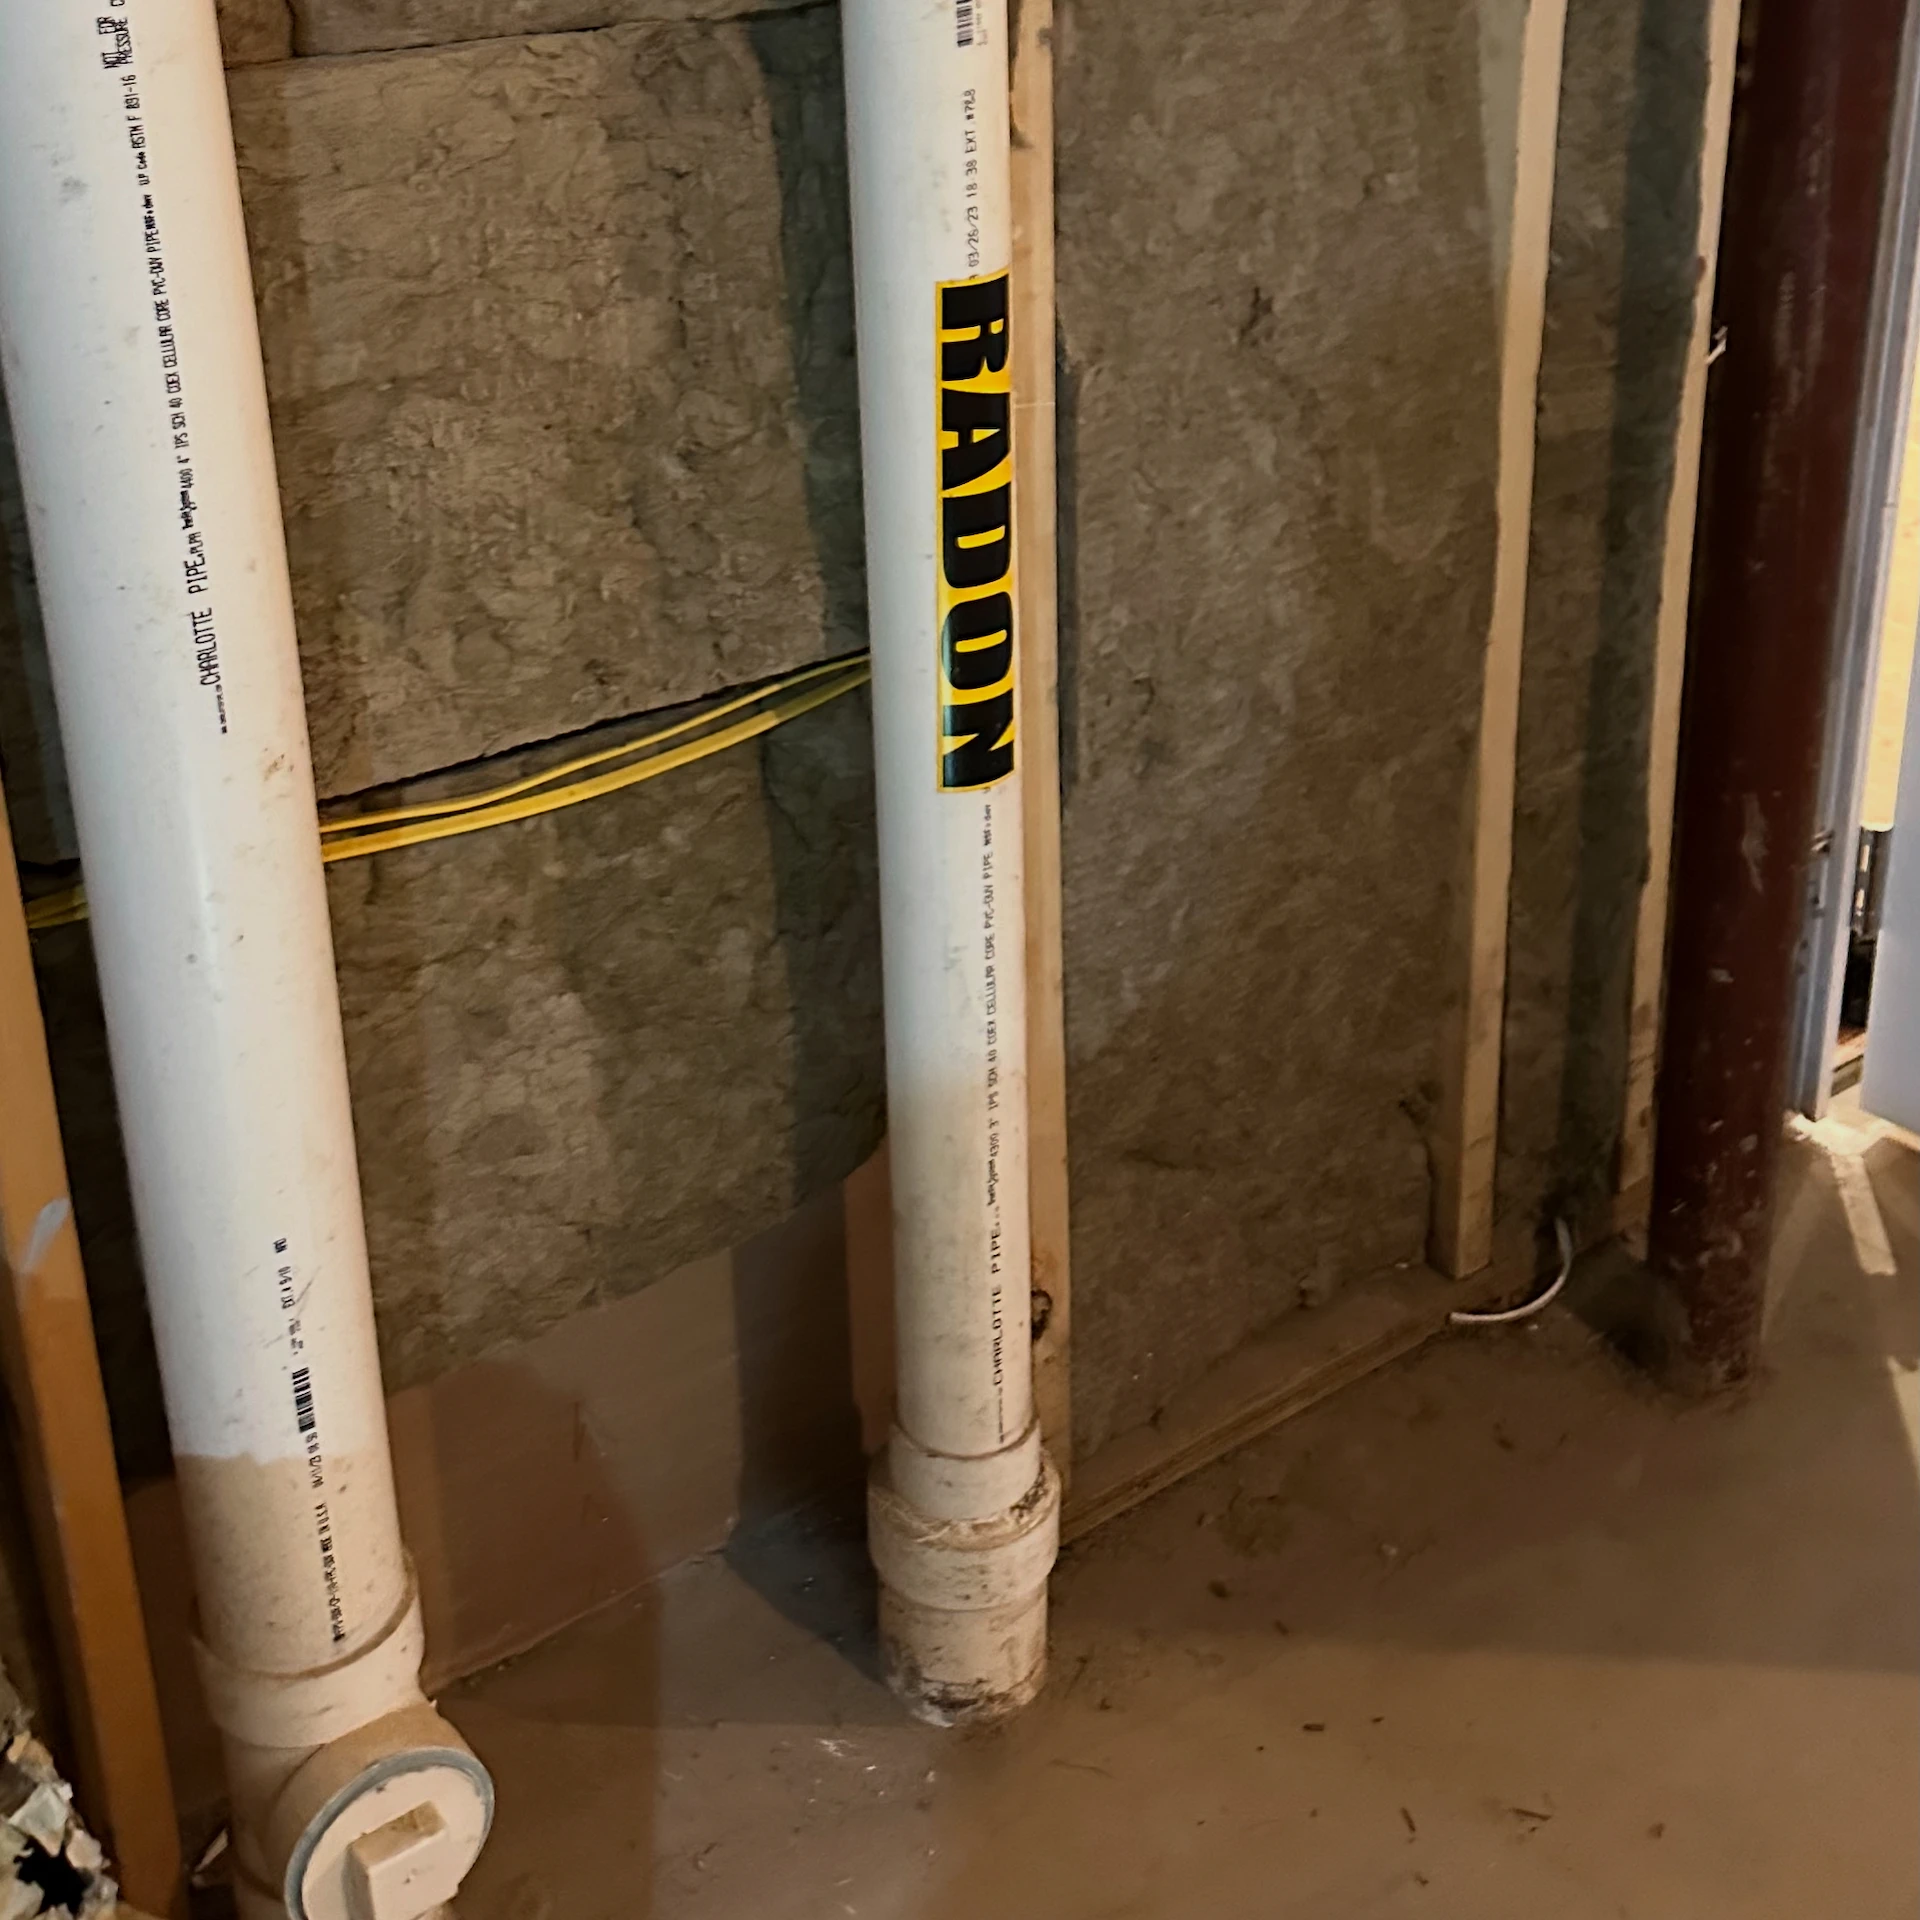
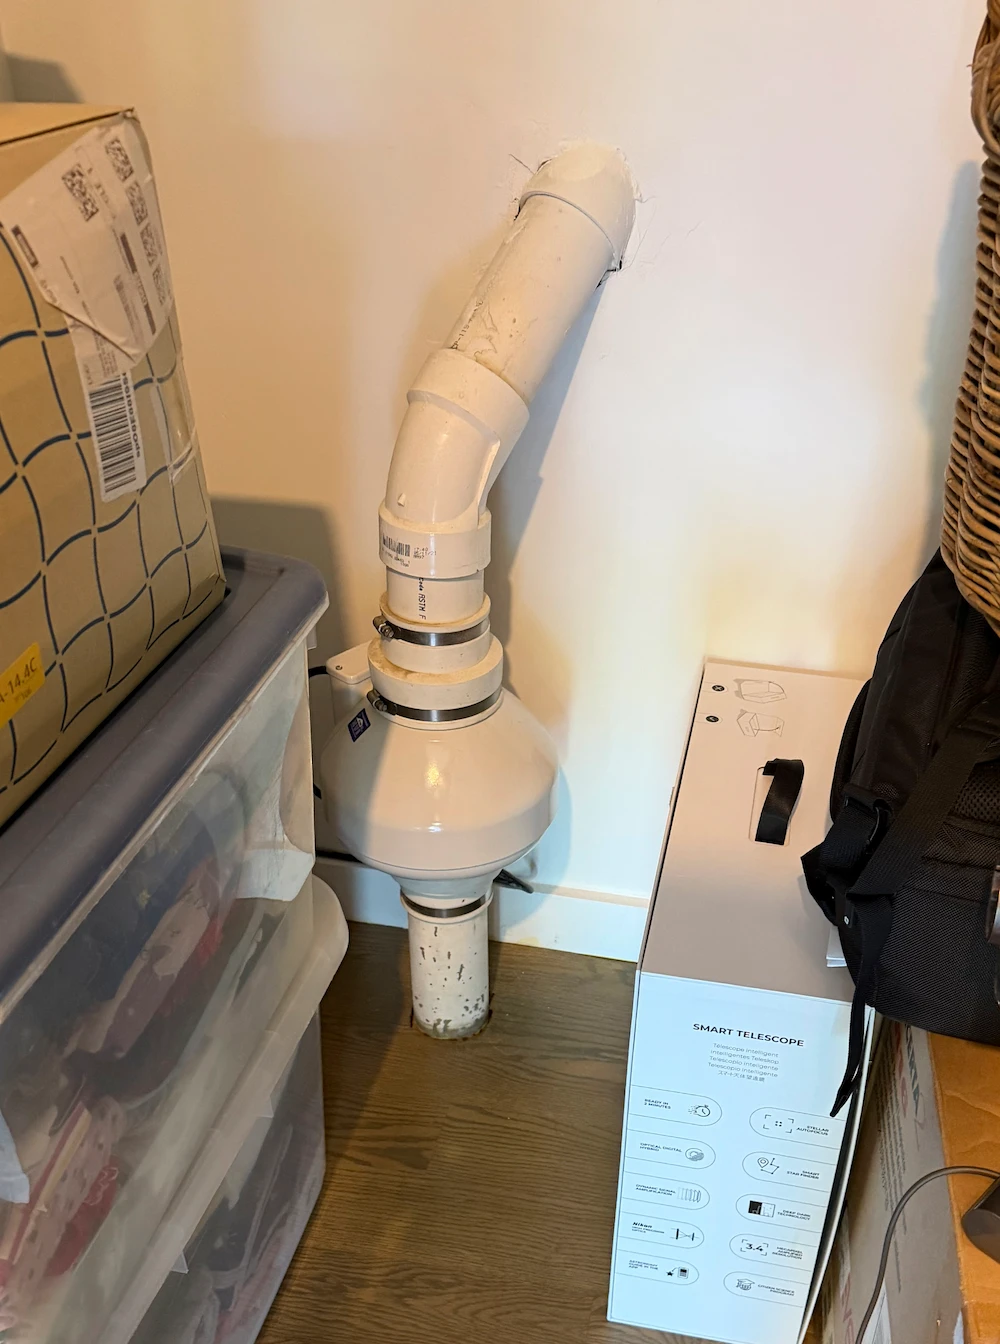
At first glance, this installation appears completely normal. The PVC piping, fan, and routing all resemble a typical radon mitigation system. Looking closer, however, reveals a critical mistake—the fan has been connected to the home's sewer vent rather than to a radon suction point beneath the slab.
Instead of removing radon from beneath the foundation, the system is pulling air from the home's plumbing system. In other words, it isn't mitigating radon at all.
Beyond failing to reduce radon, this type of installation can interfere with the home's plumbing venting system and potentially create additional odor or sewer gas concerns.
Key takeaway: Never assume a system is installed correctly based solely on appearance. Every radon mitigation system should be installed by an NRPP-certified mitigation professional and independently tested after installation to verify that radon levels have actually been reduced.
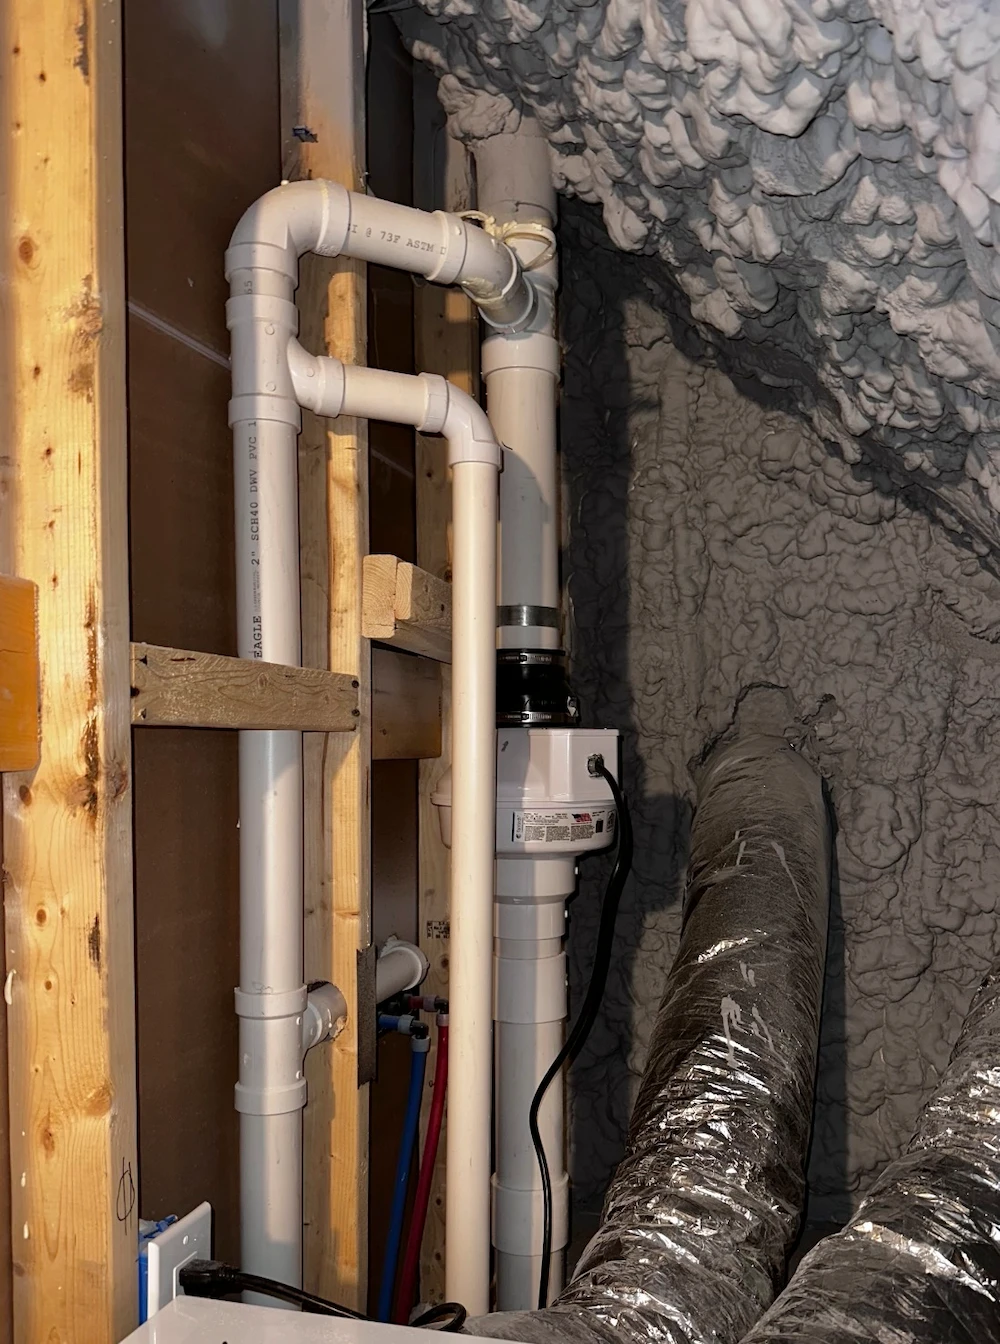
One of the most common installation mistakes we encounter is locating the mitigation fan inside the conditioned portion of the home.
While the suction side of the fan operates under negative pressure, everything downstream of the fan is under positive pressure. If any connection, gasket, or pipe joint develops a leak, radon gas can be forced directly into the living space rather than safely exhausted outdoors.
For this reason, industry standards require radon fans to be installed outside the conditioned living space—typically on the exterior of the home, in an attached garage (when permitted), or in an unfinished, vented attic.
Key takeaway: A radon fan should never be installed in a finished basement, closet, utility room, or other occupied portion of the home.
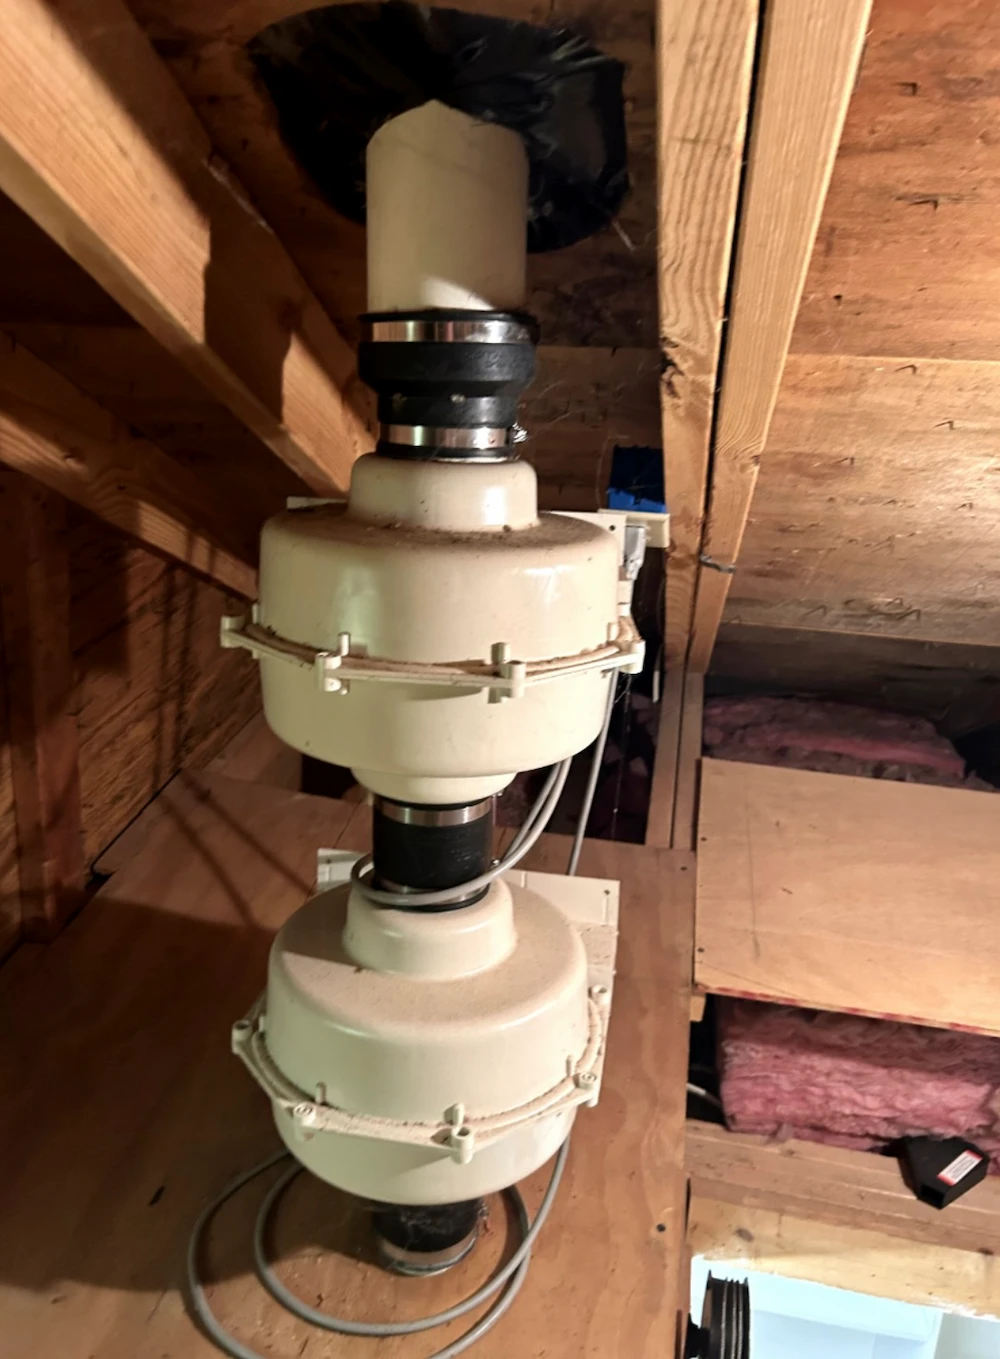
Seeing two fans on one residential radon system is an immediate sign that something deserves closer evaluation.
Proper radon mitigation begins with diagnosing the home's construction, foundation type, and airflow characteristics. The system should then be designed around a single fan that provides the appropriate airflow and suction.
Adding a second fan is often an attempt to compensate for poor system design, improper pipe sizing, inadequate suction points, or an incorrectly selected fan. Rather than solving the underlying issue, it frequently increases complexity, electrical consumption, maintenance requirements, and the likelihood of future failure.
Although there are rare commercial or specialty applications where multiple fans may be appropriate, they are generally unnecessary in a typical residential system.
Key takeaway: More equipment does not necessarily mean better performance. A properly designed residential mitigation system should rarely require multiple fans.
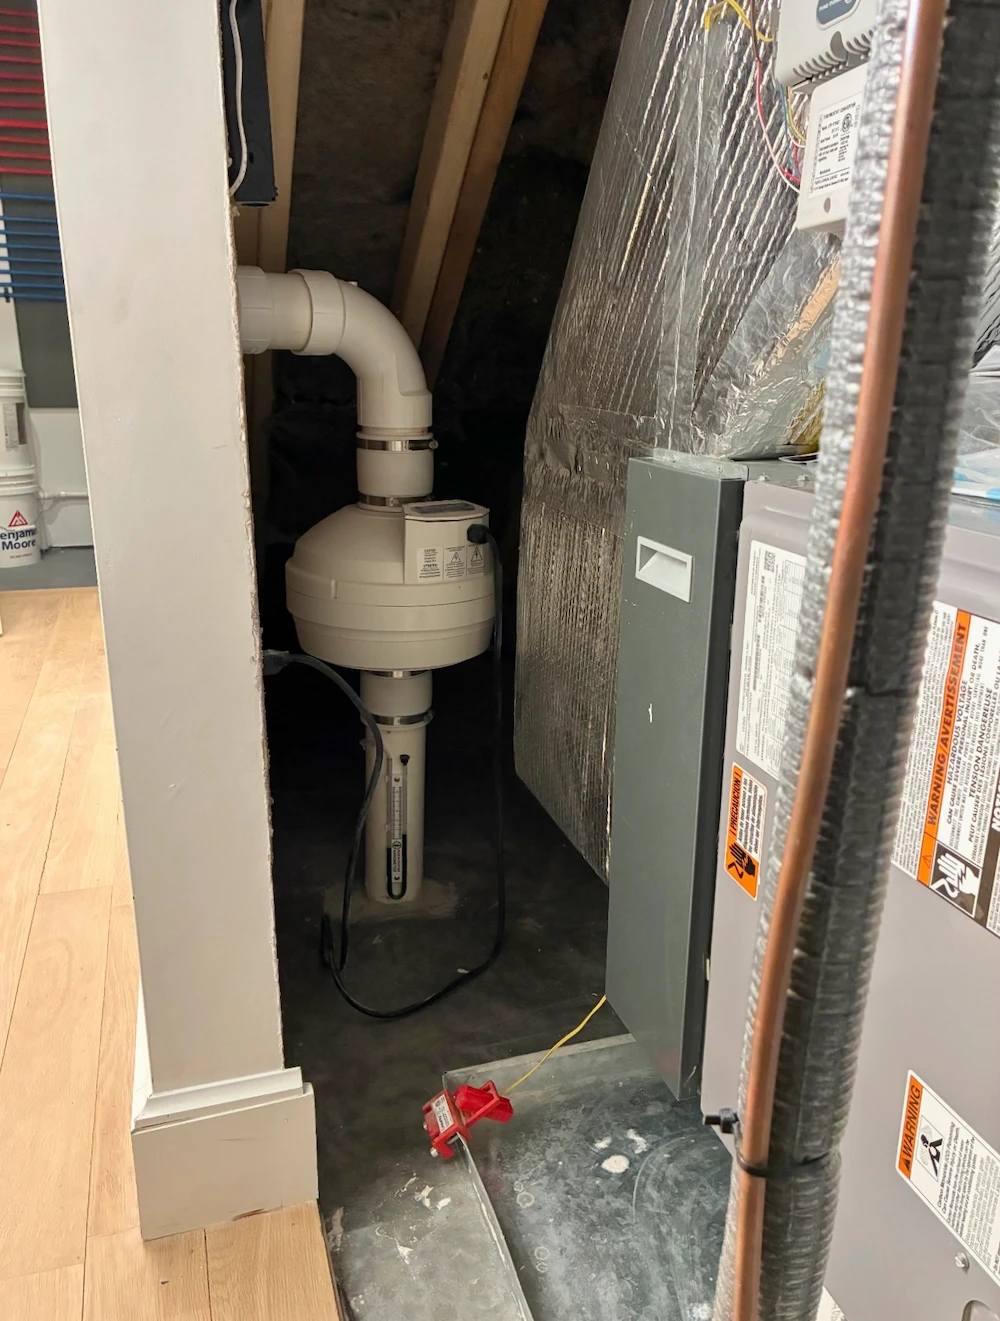
This fan has been installed inside a finished closet located within the conditioned living area of the home.
Like the previous example, everything above the fan operates under positive pressure. Over time, vibration, normal wear, or deteriorating seals can allow radon-laden air to escape into the occupied space.
Because this closet is part of the home's living environment, occupants could unknowingly be exposed to elevated radon levels even though a mitigation system is present.
This installation also introduces unnecessary maintenance concerns, noise issues, and potential service complications.
Key takeaway: Radon fans belong outside the home's conditioned envelope—not inside finished closets, bedrooms, utility rooms, or other occupied spaces.
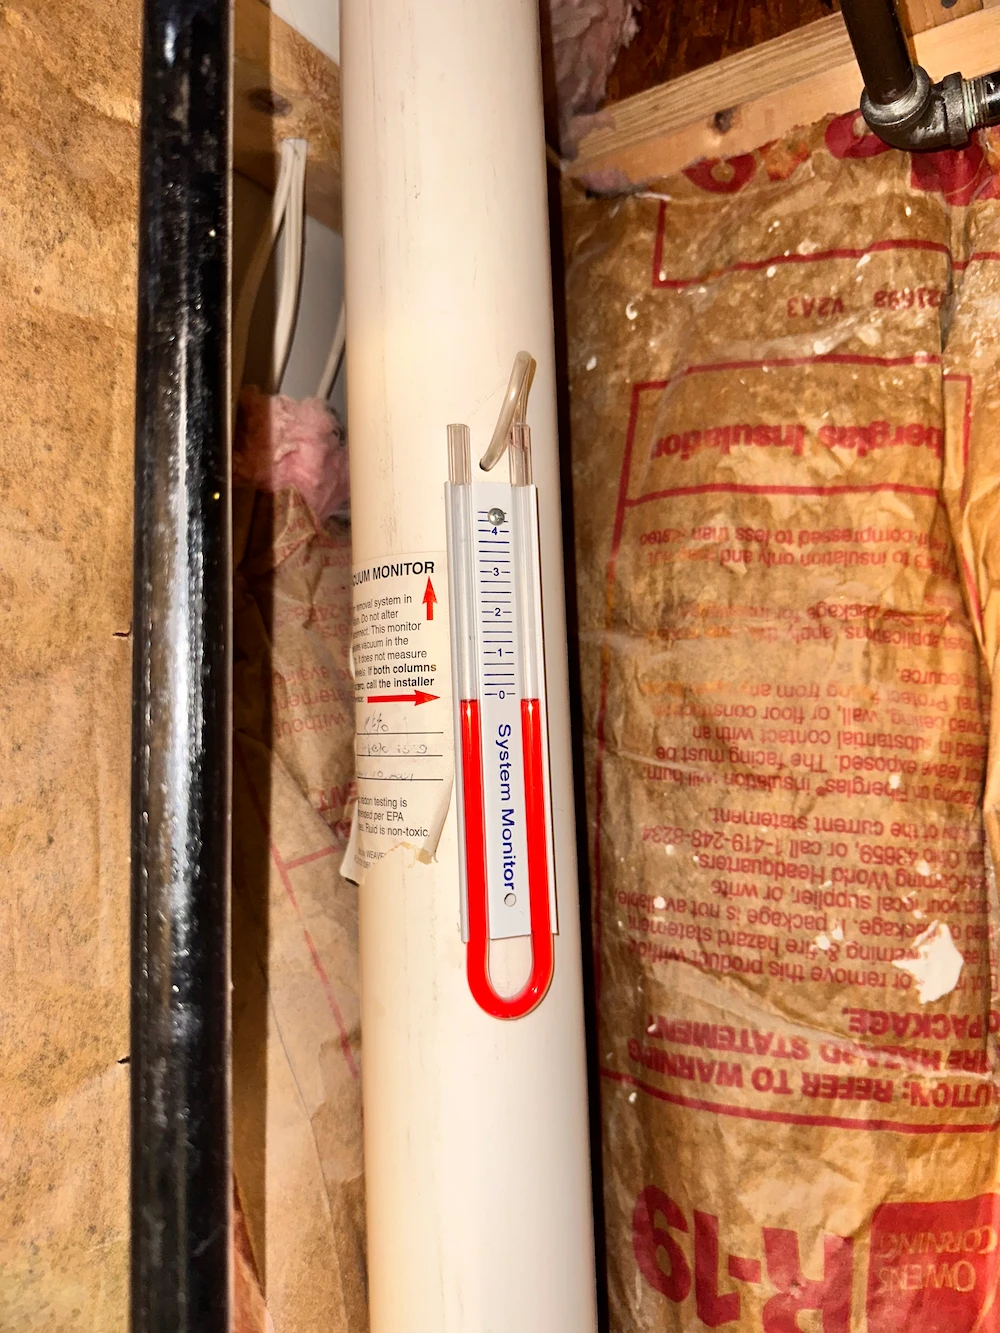
The U-tube manometer is one of the simplest but most important components of any radon mitigation system.
Under normal operation, the fluid levels on each side of the manometer should be noticeably different. This pressure difference confirms that the fan is creating suction beneath the foundation.
In this example, both sides of the manometer are level.
That means there is essentially no pressure difference, indicating that the system is not operating properly. Possible causes include:
Without suction, the system is not actively reducing radon.
Key takeaway: Homeowners should periodically glance at the manometer. If the fluid levels suddenly become equal, or change dramatically from their normal operating level—the system should be inspected immediately.
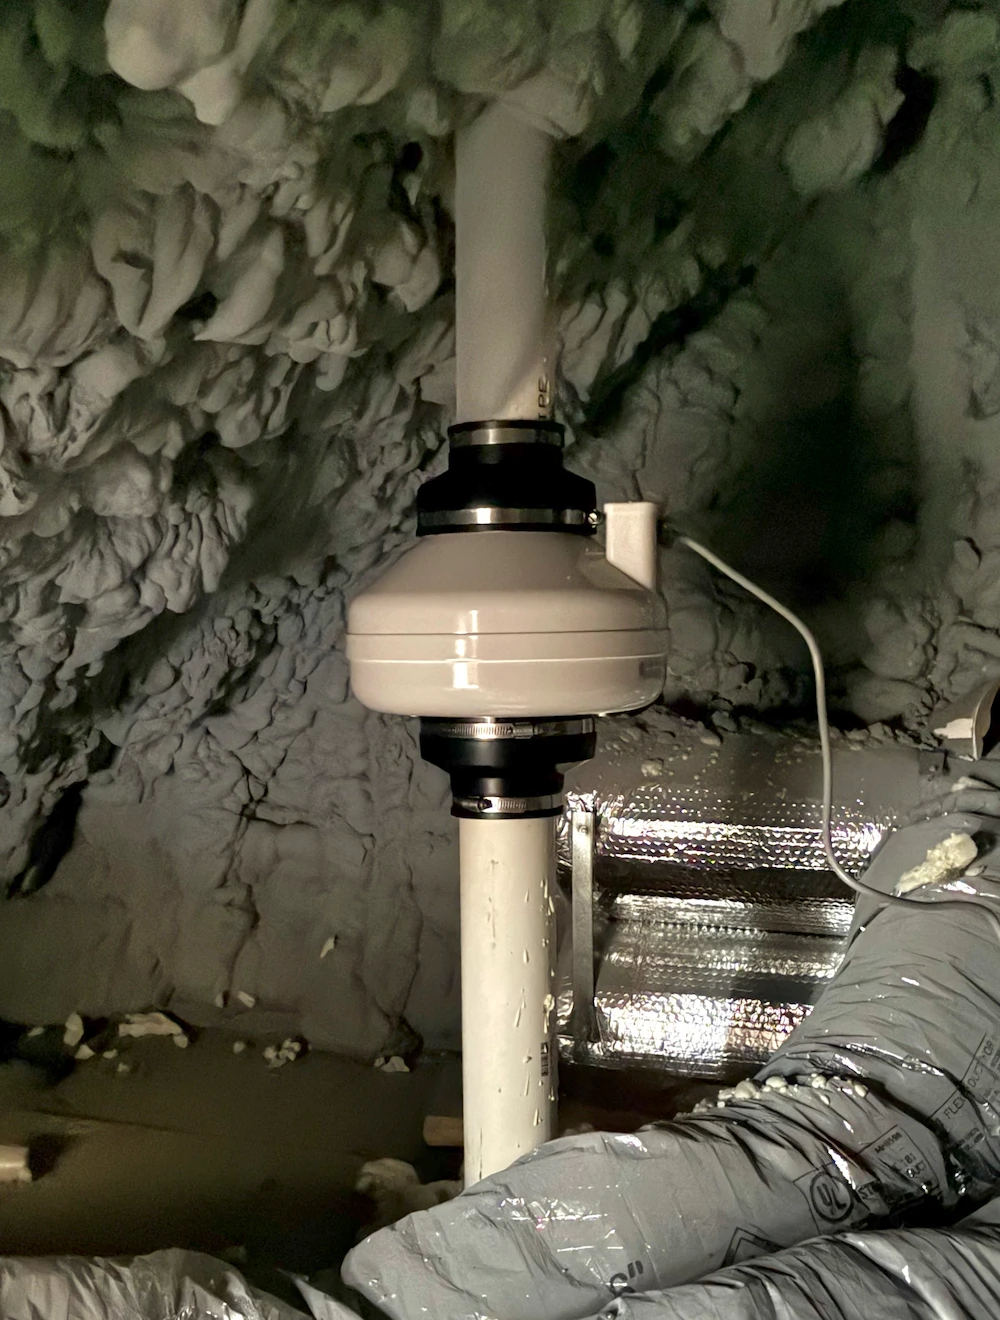
This installation places the radon fan beneath the building envelope rather than outside it.
Even if the system performs adequately when first installed, normal vibration over months and years can loosen fittings, degrade rubber couplings, or weaken seals.
Once that happens, the pressurized section of the system can begin leaking radon gas directly into areas beneath or adjacent to the home, increasing occupant exposure instead of reducing it.
Proper fan placement is intended to eliminate this risk by ensuring that any potential leakage occurs outside the occupied structure.
Key takeaway: Fan location is a life-safety consideration, not an installation preference. Proper placement significantly reduces the possibility of radon entering the home if the system develops leaks over time.
The examples above illustrate an important reality of radon mitigation. Simply having a mitigation system installed does not guarantee that your home is protected. Like any life-safety system, its effectiveness depends on proper design, professional installation, and routine verification.
A properly installed radon mitigation system can reduce indoor radon levels dramatically, often by 80-90% percent. However, even the best equipment cannot overcome poor design, improper installation, or lack of maintenance. A fan installed in the wrong location, an undersized system, a disconnected pipe, or a failed fan can all compromise the system's performance, sometimes without any obvious signs to the homeowner.
That is why independent post-installation testing is so important. Once a mitigation system has been installed and operating continuously for at least 24 hours, the home should be re-tested to confirm that radon levels have been successfully reduced. Whenever possible, this testing should be performed by an independent NRPP-certified radon measurement professional rather than the contractor who installed the system. Independent verification provides confidence that the system is performing as intended and that your investment is delivering the protection your family deserves.
Protection does not end after that first test. Radon levels can change over time as homes settle, foundation conditions evolve, fans age, or renovations alter how air moves through the building. Even if your system appears to be operating normally, experts recommend testing your home at least every two years and after any significant structural or mechanical changes to the home. A simple test is the only way to verify that indoor radon levels remain low.
Fortunately, maintaining a radon mitigation system is relatively straightforward. Periodically check the manometer to confirm the system is operating, listen for changes in the sound of the fan, visually inspect exposed piping for damage, and schedule routine radon testing. These simple steps can help identify problems before they result in prolonged radon exposure.
Ultimately, a radon mitigation system should be viewed as a long-term investment in your home's safety and your family's health. When properly designed, professionally installed, and routinely verified through testing, it provides reliable, continuous protection against one of the leading environmental causes of lung cancer. By choosing qualified professionals and making periodic testing part of your regular home maintenance routine, you can have confidence that your mitigation system is continuing to do the job it was designed to do.
The MKC Team represents the collective expertise, experience, and dedication of the professionals at MKC Associates Home Inspection. The team operates with a collaborative approach, combining decades of experience in home inspection, construction, engineering, property management, and related fields to provide reliable and informative content for homeowners and buyers.
Contact MKC Associates to schedule your home reinspection and keep the purchase process moving quickly!
Schedule Now